By Karen Knaspstein
While you may not be installing carports on the windy, open plains, even occasional gusts are enough to wreak havoc on a structure built with light-gauge metal framing — especially if it’s not fully enclosed. As an installer, you’re not only the last line of defense, but also the one the carport manufacturer will be calling on if the carport fails to stand up as expected.
With about a decade of experience, Neil Osborne, Express Carport [www.expresscarport.com], explained how the steel building industry is growing incredibly quickly. “Some time ago, you could choose three styles of carport up to 21’ x 30’,” he said. “The industry now offers dynamic solutions for putting a roof over an area up to 100’ wide. We have engineered plans to be more competitive with pole barns and red iron buildings. We can do anything from carports up to barndominiums.” Regardless of the building’s size or purpose, it must be properly braced and anchored.
Certified vs. Non-certified Buildings
“You have two different types of carports: certified and non-certified,” explains Osborne. A non-certified structure is built to whatever the manufacturer thinks is OK; they may or may not use engineering in the structural plan. The gauge of the steel tubing, the leg spacing, the bracing are all based on whatever the manufacturer believes will be sufficient.
“Our company sells only certified buildings,” he continues. Depending on the building, the cost of an engineered versus a non-engineered building might be a couple hundred dollars. “For the cost of $300 for certified versus non-certified, I’d rather sell certified. It’s not going to fail, and it’s not worth the liability. The wind won’t destroy the building or the items under the building. Within our engineered plans are callouts for every size of building and the rules for how they should be anchored and braced,” he continues.
Regional Influence
The region in which the buildings are going to be placed influence the anchoring specifications. “Primarily, we operate in North Carolina and South Carolina. None of our locations have a wind rating higher than 115 mph,” he says. “And we don’t have any snow ratings higher than 15 psi. When you get closer to the coastline, you’ll have upwards of 190mph wind ratings in South Florida. The anchoring and structural integrity to withstand that type of wind is going to vary.”
Anchoring: “Earth”
If anchoring a carport into grass, dirt, gravel or other non-manmade surface, the common practice is to anchor carports with 20”-long rebar spikes by pounding the spikes through holes that are pre-drilled through the base rail into the earth. This will hold the building to the earth but there’s no protection against the wind. Osborne says, “If it’s only anchored with rebar spikes, a wind gust can relocate the building.”
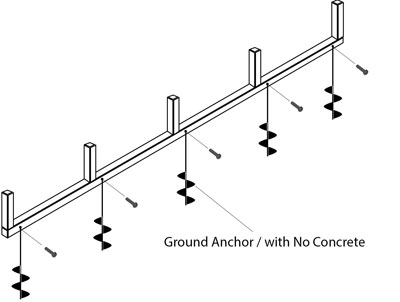
Using spiral auger anchors instead of rebar will hold the building fast and will give the owner a building certified for wind ratings. “Depending on the density of the soil, most plans call for 36” mobile home anchors,” he explains. A hole is drilled in the base rail, a bolt goes through the eye of the anchor, and it’s fastened with a nut and washer. Properly anchored with spiral auger anchors, the structure is protected against uplift.
When anchoring a carport to the earth, the distance between the anchors depends on the building; the number and placement are specified on the plans. Anchors should be placed within 8’ of each corner of the building. As an example, a 20’ building with legs 10’ apart would have four anchors (two on each side); a 30’ building would have six anchors (three on each side). There shouldn’t be more than a 16’ gap between any two anchors. The same rules apply as buildings get larger.
Anchoring: Asphalt
If you’re anchoring a carport on an asphalt surface, it’s a little different. Mobile home anchors are used following the same distance guidelines as anchoring on earth. Thirty-two-inch-long anchors are inserted through pre-drilled holes in the base rail. A small hole is made in the asphalt and the anchor is driven through the asphalt into the ground with a sledgehammer.
Anchoring: Concrete
If the carport is to have a concrete foundation, the concrete pad usually measures at least 5” with footers that go down at least 12” into the earth. The structure is again anchored through holes in the base rail. In this case, concrete wedge anchors are used. A hole is drilled through the top of the base rail within 6” of each leg into the concrete pad. Concrete wedge anchors (Red Heads) are installed through the holes into the concrete. As the bottom sleeve of the anchor expands, it creates a wedge to prevent the bolt from backing out and holds the building fast.

There are some variances, depending on the engineering, where bolts need to be. “Some manufacturers are adding L brackets to the base rail to get away from the edge of the concrete,” explains Osborne. “Concrete has been known to crack off as you get close to the edge, which would reduce the integrity of the anchoring system. Some manufacturers are also starting to do some modifications and do some different things to bring the bolts inward, and away from the edge of the slab.”
Tips & Tricks
Osborne shares practical advice that may save installers some trouble down the road. “Make sure you have everything on your truck before you leave,” he advises. “From anchors to braces to whatever that may be.” And make sure you know what the installation surface is for each structure.
Armed with the knowledge of the surfaces you’ll be working with, also make sure you have all the tools in the truck that you will need for all the jobs on the load. “Drills, drill bits, auger machine to drive mobile home anchors into the ground. Everything. Be prepared to do the job,” he advises. “If you leave your home base without the tools needed, that’s not one customer that’s impacted, it’s five (or however many buildings you have on your truck).”
You need to also make sure the customer has marked the ground. “If you’re driving anchors 36” into the ground, you don’t want to drive a 3” auger through a septic line,” he warns. Get verification from the homeowner that there’s nothing in harm’s way.
Most manufacturer work orders say the installers and manufacturers are not responsible for underground damage, whether from the truck and trailer or from driving augers or anchors.

“It never hurts to ask again,” he says. “Some installers carry an additional signoff sheet. Ultimately, we don’t know what’s in the customer’s ground. Getting confirmation and getting additional signoff is never a bad idea. As an independent contractor you want to protect yourself. If you haven’t confirmed there’s nothing under here and you hit a pipe or electrical line, having that signoff to indemnify yourself is always a good thing.”
Osborne also says that in most cities it’s not required that the homeowner show the installer a permit. “Most people have a fear of being cooperative,” he says. “We don’t report to any permit agencies; it’s completely up to the customer to pull a permit. If a permit has been pulled, most of the time a septic inspection is included in the placement permit; it’s a little more certainty that you’re good to go.”
Osborne cautions that installers should never forget to put the anchors in if it is a certified building. And if it’s not a certified building, follow the anchoring guidelines to assure the structure stays put. “If it’s not a certified building, when on-site always offer additional anchoring whether the customer needs to pay for them directly or go through the dealer,” he recommends.
The installer is the last level of protection for the customer; it’s always a great precaution. “It might cost $30-$40 to have it done,” he says, “but it’s a lot less expensive to put anchors in and let the customers know that it’s not every day you’re going to have a gust of wind that will send a building flying. But on the occasion that it does happen, it’s a giant parachute effect. Rebar anchors are just not going to hold it down.” Don’t skimp on the anchoring system out of respect for the safety of the homeowners and their neighbors.
“Always carry extra anchors in your truck,” Osborne recommends. “Every customer needs them; never roll without them. Also, always ask the customer what the installation surface is and make sure to always have all three types of anchors in your truck.” To eliminate extra trips back to the shop or manufacturer, you want to carry enough along to anchor however many carports you’ve got on the load. “The last thing you want to do is finish up a building except for the anchoring,” he says.
Conclusion
Installing the anchors is the final step before the job is done. “It’s the last step driving in those anchors, but installers are all getting paid by the job,” says Osborne. “We tell our customers go through and look and makes sure you got everything you paid for.” Once the anchors are in you can move on to the next install. GSCB


